Setting Up Microsoft Azure Webhooks: 2 Easy Steps
| Table of Contents |
Introduction to Microsoft Azure
Microsoft Azure is a public Cloud Computing platform that provides solutions including Infrastructure as a Service (IaaS), Platform as a Service (PaaS), and Software as a Service (SaaS). Companies and individuals use these Microsoft Azure services for Analytics, Visualization, networking, etc. Developers use Microsoft Azure for building, testing, deploying, and managing applications. It is compatible with all languages and frameworks and ensures that your data is protected and backed up.
Around 80% of the fortune 500 companies use Microsoft Azure services for their cloud computing needs. Microsoft Azure offers different subscription options. Once the user subscribes to Microsoft Azure, they have access to all the services available in Microsoft Azure Portal. The services are used to create Virtual Machines (VMs), Databases, etc. It delivers integration features with the help of REST APIs, Connectors, and Webhooks.
Key Features of Microsoft Azure
Microsoft Azure allows companies to manage their business activities efficiently and helps in optimizing the operations with scalable solutions. A few features of Microsoft Azure are listed below:
- Highly Flexible: Microsoft Azure supports multiple languages, frameworks, operating systems from Windows to Linux, Oracle to SQL Server. It allows developers to create robust Sharepoint applications and services to run on every device.
- Data Analytics: Data Analytics and ML-powered insights support are a core part of Microsoft Azure. Companies use these features in finding new business leads, improving customer service, and making strategic business decisions.
- Hybrid Ready: Microsoft Azure offers Public Cloud as well as On-premises Data Center solutions for its customers. It comes with data backup, storage, and security features.
- Development Support: With the help of Microsoft Azure, Developers can build any type of scalable solutions from E-Commerce solutions and serverless computing to game development and Internet of Things (IoT).
To know more about Microsoft Azure, click here.
Introduction to Webhooks
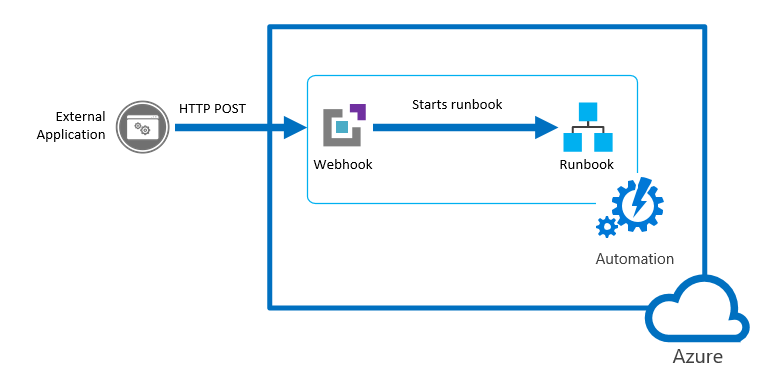
Webhooks are one of the ways applications communicate with other apps or platforms. It is similar to how you receive a notification when any new message arrives. Webhooks trigger events when any change is detected for the defined set of rules. The information or messages are delivered to a unique URL for every event triggered. On the other hand, in the URL, a listener is active to receive the message, and then a specified event executes.
Webhooks use HTTP requests to transfer data in the URL from one point o another endpoint. Once a condition is met for a specified event, it triggers the message from one endpoint and binds the message in the URL. Then the message is sent using the GET and POST methods to the other endpoint. Webhooks are generally used to connect to different platforms, and it is a cost-effective solution.
Steps to Set Up Microsoft Azure Webhooks

Now that you have understood about Microsoft Azure and Webhooks. in this section, you will go through the steps to set up Microsoft Azure Webhooks connection for the runbook. The steps for the Microsoft Azure Webhooks are listed below:
Step 1: Creating a Microsoft Azure Webhook
- Log in to your Microsoft Azure Portal, here.
- Now, navigate to your Automation account.
- Go to Runbooks to open the runbooks page.
- Select your runbook that you want to use or create a new runbook by clicking the “Create a new Runbook” option and providing all the details required to create a new runbook.
- For this Microsoft Azure Webhook tutorial, the PowerShell runbook type is used.
- Your new window for the PowerShell runbook editor will open up.
- Paste the code given below in the PowerShell editor runbook.
- Save the code and publish it.
- You will return to the runbook overview page. Here, click on the “Add Webhook” option located on the top of the menu bar.
- Now, on the new page, click on the “Create new Webhook” option to create a new Microsoft Azure Webhook.

- Let all the configurations remain the same for now and copy the Microsoft Azure Webhook URL in a safe location as it cannot be accessible again to copy.

- Click on the “Ok” button to add a webhook, and it redirects you to the runbook overview page.
Step 2: Using Microsoft Azure Webhook With PowerShell
- Now, the Microsoft Azure Webhook has been created. It’s time to test the Webhook by sending data to the Microsoft Azure Webhook URL using PowerShell.
- For this Microsoft Azure Webhook tutorial, a simple message is created to send in the body of the message. PowerShell cmdlet Invoke-WebRequest to send the POST request to the new Microsoft Azure Webhook.
- Open up your Windows PowerShell or create a .ps1 file in the editor.
- Paste the code given below in the PowerShell window.
- Now, create a new variable named “$webhookURI” and assign the Microsoft Azure Webhook URL that you copied earlier to this variable as a string.
- Then paste the given code below in the PowerShell window.
- Execute the code in PowerShell and review the output in the runbook.
That’s it! You have successfully established a connection to Microsoft Azure Webhook.
Benefits of Using Microsoft Azure Webhooks
Microsoft Azure Webhooks allow companies to automate actions, monitor data using Azure alerts, and much more. A few more benefits of Microsoft Azure Webhooks are listed below:
- Microsoft Azure Webhooks allows developers to execute scripts automatically when specified condition fulfills using Azure Automation Runbooks.
- Microsoft Azure Webhooks help users trigger Logic Apps that build integration solutions delivering scalability and accessibility.
- Receive text messages via VOIP services like Tiwllio and notifications from Slack, HipChat, and Campfire.
Conclusion
In this article, you read about Microsoft Azure and Webhooks. You also learnt the steps to set up Microsoft Azure Webhooks for the runbook. At the end of this article, you explored a few key benefits of using Microsoft Azure Webhooks and how it helps companies and developers automate simple development and workflow tasks and save time.